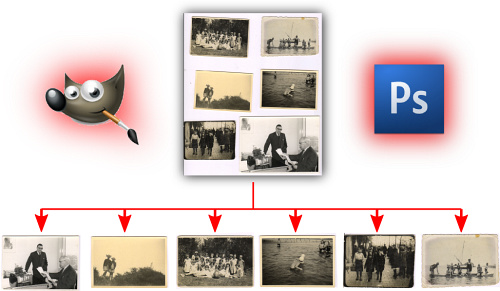
In this post, I’ll show you two ways in which you can automatically split a (collection of) scanned pages, each containing several photos, into individual image files. My experience is that for this, GIMP works better than Photoshop, and as an added bonus, it’s free!
Just like you, I also have old photo albums at home. Albums with family photographs, glued to paperboard pages. And you also probably want to have them in digital format – e.g. to share with family members, to protect them from degradation and loss, or just for your digital library.
In my case (and probably in yours), the negatives of many of these photographs are unavailable. So the only option is scanning the prints themselves.
Removing the photos from the album pages before scanning them is time-consuming, and may even harm them. So your only option is photographing them individually, or whole-page scanning/photographing. Of these, the latter is the fastest and easiest, since macro-photographs of a single photograph are tricky in terms of lighting, focus, and framing.
But here you run into another problem: you end up with tens to hundreds of scanned pages, each containing multiple distinct photographs. Unless you have the hand-eye coordination of a surgeon, most images will also be slightly skewed. And even if the page is straight, individual photos may be skew relative to the page since they were glued that way.
You could manually rotate, crop, and save each photo, but this takes a lot of time. So isn’t there an easier way? Of course, there is! You’re not the first person who wants to do this. I wasn’t either – but it took me a bit of googling to find a good solution, and now I want to save you the trouble and share it with you.
Using Adobe Photoshop
Photoshop is the first place where you would expect a solution to exist since it is the veritable industry standard for photo editing and graphic design.
In recent versions of Photoshop, you’ll find the following item in the “File” menu:
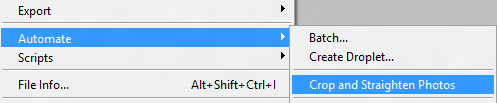
I used Photoshop CS5. The same should apply to other recent versions. The function shown above works on a single scanned page. To process a whole folder of scanned pages, you’d want to use the following option (also in the “File” menu) instead:
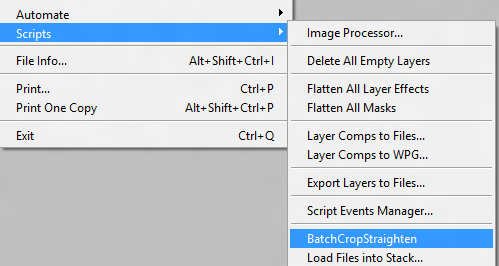
This takes you to a directory browser dialog. Press “ok”, and you’ll see Photoshop run through each scanned image, cropping, rotating, and saving each individual photo into an automatically created subfolder with the name “Edited”.
Generally, Photoshop works well but also had several bloopers. For me, it failed to split the three photos, while simultaneously cropping part of the adjacent photos into the output. Not good.
Edit using GIMP + BIMP

GIMP is a free alternative to Photoshop. GIMP, short for GNU Image Manipulation Program, is a free and open-source photo editing software. It has been around since the mid-1990s, originally created as a free alternative to commercial image manipulation programs. Since then GIMP has grown into an incredibly powerful program that can be used for basic image editing tasks such as cropping, resizing, and color adjustments all the way up to more advanced functions like creating digital artwork or applying special effects.
GIMP provides users with full control over their images by allowing them to customize any aspect of their photos; from adding layers and text titles to creating complex masks and filters. It is compatible with the most popular operating systems including Windows, Mac OS X, and Linux.
The basic interface and functionality of GIMP are similar to Adobe Photoshop, although its multiple-window interface is a bit unusual and quirky compared to other mainstream Windows software.
Standard GIMP doesn’t have a batch-cropping option, but you can install a plugin to automate this task. I’ll now show you how (fear not: it is quite easy).
- First download the GIMP + BIMP Image Manipulation Plugin from here.
- Once you have downloaded the file, double-click the “gimp-plugin-bimp_win32.exe” file.
- Complete the installation process.
You’ve successfully installed BIMP, you’re halfway there.
Step 1: Now, start the GIMP program and click on File > Batch Impact Manipulation. This will open a dialog box as shown below:

Step 2: You can add images or add a complete folder by clicking on the “add images” button.
Step 3: Once you have selected the images, click on the “+Add” button and choose any of the following options:
- Resize
- Crop
- Flip or Rotate
- Color Correction
- Sharp or Blur
- Add a Watermark
- Change format and compression
- Rename with a pattern
Each option will lead to another window that will guide you through the whole process, quite simple and self-explanatory.
Note: You can add multiple options in the manipulation set. For example, I can batch-crop and resize images at the same time. On top of that, I can also color-correct them.
Step 4: Once you have selected all the required options, click on apply and the plugin will start doing its job.
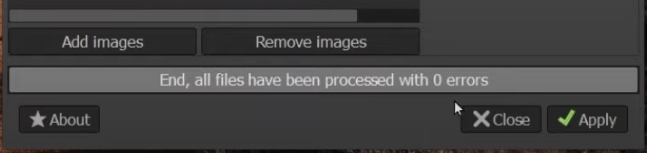
Step 5: Go back to the folder where your images were stored, a new folder with “Batch Edits” will be there sitting and waiting for you.
Comparing Photoshop with GIMP surprised me, in that GIMP’s filter seemed to be much more reliable, even straight out of the box. It is also possible to customize the filter’s behavior to suit your specific stack of scans.
Note, however, that both of these solutions (Photoshop or GIMP) can and will fail for difficult cases. Here are some tips you should follow to maximize your chances of success:
- The photos should not overlap or touch each other. If they do, they will not be divided from each other by the automatic script
- The scan/photograph borders should be cropped in such a way that it doesn’t extend beyond the page background, and the page background should extend up to or beyond the image borders e.g. – seeing the wooden floor (on which an album was placed while photographing it) will screw up the algorithm unless you carefully set up the “Background Sample X/Y offset” values.
- The page background should be uniform (white or black are good) and have enough contrast relative to the photos
- The page (including the background) should be evenly lit
Good luck and feel free to comment on your experiences!