05
2013How to batch separate & crop multiple scanned photos
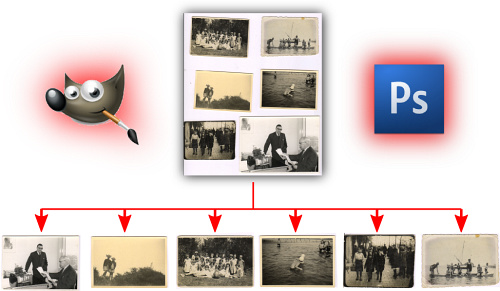
In this post I’ll show you two ways in which you can automatically split a (collection of) scanned pages, each containing several photos, into individual image files. My experience is that for this GIMP works better than Photoshop, and as an added bonus: it’s free!
Caveat: The “deskew” operation in the GIMP script only works on Windows computers due to its dependence on “deskew.exe”. If you use Apple or Linux this step will be silently skipped, and the rest of the script will work.
[2016-02-14 The GIMP script has been revamped, with new functions as well as a bugfix for non-white backgrounds. Works for all OS’es!]
[2013-05-16 Update: the GIMP script can now handle TIF files as well]
[2014-10-02 Handles reading .tiff and .jpeg extensions too. Output dpi set to 600.]
Just like you, I also have old photo albums at home. Albums with family photographs, glued to paperboard pages. And you also probably want to have them in digital format – e.g. to share with family members, to protect them from degradation and loss, or just for your digital library.
In my case (and probably in yours), the negatives of many of these photographs are unavailable. So the only option is scanning the prints themselves.
Removing the photos from the album pages before scanning them is time-consuming, and may even harm them. So your only option is photographing them individually, or whole-page scanning/photographing. Of these the latter is the fastest and easiest, since macro-photographs of single photographs is tricky in terms of lighting, focus, and framing.
But here you run into another problem: you end up with tens to hundreds of scanned pages, each containing multiple distinct photographs. Unless you have the hand-eye coordination of a surgeon, most images will also be slightly skew. And even if the page is straight, individual photos may be skew relative to the page since they were glued that way.
You could manually rotate, crop and save each photo, but this takes a loooot of time. So isn’t there an easier way? Of course there is! You’re not the first person who wants to do this. I wasn’t either – but it took me a bit of googling to find a good solution, and now I want to save you the trouble and share it with you.
Solution 1: Adobe Photoshop (easy, costs money, regularly screws up)
Photoshop is the first place where you would expect a solution to exist, since it is the veritable industry standard for photo editing and graphic design.
In recent versions of Photoshop, you’ll find the following item in the “File” menu:
I used Photoshop CS5. The same should apply to other recent versions. The function shown above works on a single scanned page. To process a whole folder of scanned pages, you’d want to use the following option (also in the “File” menu) instead:
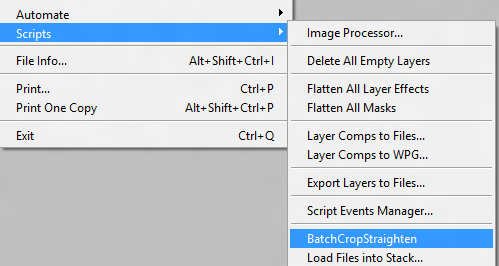
This takes you to a directory browser dialog. Press “ok”, and you’ll see Photoshop run through each scanned image, cropping, rotating, and saving each individual photo into an automatically created subfolder with the name “Edited”.

Photoshop’s “BatchCropStraighten” makes the occasional blunder
Generally Photoshop worked well, but also had several bloopers like the one above. You can see how it failed to split the three photos, while simultaneously cropping part of the adjacent photos into the output. Not good.
OR….
Solution 2: Gimp (easy, free, customizable, sometimes screws up)
GIMP is a free alternative to Photoshop.
The basic interface and functionality of GIMP is similar to Adobe Photoshop, although its multiple-window interface is a bit unusual and quirky compared to other mainstream Windows software.
Standard GIMP doesn’t have a batch-cropping option, but you can install a plugin to automate this task. I’ll now show you how (fear not: it is quite easy).
For automatically splitting scanned photographs I came across a plugin called “Divide Scanned Images”. Originally by Rob Antonishen, and posted here, I’ve patched this original version to include improvements suggested by readers in that forum. You can download my version from the step-by-step guide below. And the good news is that, in addition to being free, in my experience it works better than Adobe Photoshop for detecting and dividing scanned photographs! To make it run, you’ll have to
- Download and install the latest version of GIMP (click here).
- Optional (and for Windows users only) : Download deskew.exe (click here) to GIMP’s plugin directory.
On my computer this is C:\Program Files\GIMP 2\lib\gimp\2.0\plug-ins - Download DivideScannedImages_improved_v2.zip (click here). *If you want the old (obsolete) version of the script you can still be found here.
Unzip, and copy DivideScannedImages.scm to the GIMP scripts folder. On my computer this is
C:\Program Files\GIMP 2\share\gimp\2.0\scripts - Restart GIMP. You should now see the “Batch Divide Scanned Images…” option as a sub-menu under “Filters -> Batch Tools”. Click on it.
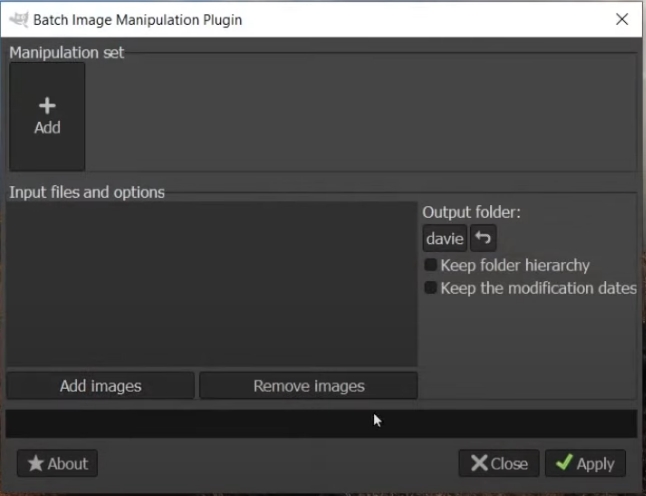
- Unlike Adobe Photoshop, this plugin gives you some choice on how you want it to behave. Many of these settings should be self-explanatory. Important is that your scanned images have a consistent region that represents the “background color”. Typically this would be the corners of your scanned image. For me, the following settings worked well:
“Selection Threshold” controls how sensitive the background color is defined in terms of separating it from the foreground photos. Play around!. Furthermore I changed the “Max number of items” specifies the maximum number of sub-photos can be detected on a single page. In our case no page contained more than 20 photos, so I set it to 20. Feel free to experiment with these settings.
The “load from” directory should point to the folder of input scanned pages, and the “save directory” to an empty directory that will contain the output. - Click on OK, and watch it run through all your photos.
Comparing Photoshop with GIMP surprised me, in that GIMP’s filter seemed to be much more reliable, even straight out of the box. It is also possible to customise the filter’s behavior to suite your specific stack of scans.
Note, however, that both of these solutions (Photoshop or GIMP) can and will fail for difficult cases. Here are some tips you should follow to maximize your chances of success:
- The photos should not overlap or touch each other. If they do, they will not be divided from each other by the automatic script
- The scan / photograph borders should be cropped in such a way that it doesn’t extent beyond the page background, and the page background should extend up to or beyond the image borders e.g. – seeing the wooden floor (on which an album was placed while photographing it) will screw up the algorithm unless you carefully set up the “Background Sample X/Y offset” values.
- The page background should be uniform (white or black are good), and have enough contrast relative to the photos
- The page (including the background) should be evenly lit
Good luck and feel free to comment on your experiences!
Elden
Thank you so much for this info…it’s exactly what I was needing for my old family photos. Great job!
rol
Thanks a lot! Very good tutorial on how to crop files! It saved a lot of hours!
Paul P
THANK YOU!!!!!! Huge timesaver!
jd
Worked great!! I’m really impressed.
I was waiting to find a nice scanner at the office with a good paper feeder to do them all at once, but we never got one. This won’t be so bad this way, since I can do 5 photos at a time and the quality is great.
goyakkit
Thanks dude. You rock!
Zka
Or use AutoSplitter, which is an automated, specialized tool for this very task!
See http://autosplitter.com/
Touliloup
And cost 20$ while this script do the same for free…
Heinz
AutoSplitter does a poor job, you can try the trial version.
Alvin D
This is a great system and is just what I needed to save me a lot of time. Can’t wait to explore other feathers. Your instructions were right on. Thanks
Charity
I desperately want to try this, as my Dad is trying to scan in some old family photographs with a scanner we got him, however every time I try to run the deskew.exe it gives me the following error:” The program can’t start because libgimp-2.0.dll is missing from your computer. Try reinstalling the program to fix this problem.”
I have tried resinstalling the program and even tried installing older versions, none of which has fixed this problem. If anyone can help me with this I would be very grateful.
fmalan
You should maybe try a Gimp forum as well since this may be a general problem with Gimp?
Shanna
I’m having the same issue! Were you able to fix it?
Canuck3
This happens if you try to drag and drop the deskew program into the plugin directory *onto* a file that already exists in there. If you look closely, it is trying to open deskew with that file, which you don’t want. Just copy and paste it and it’ll copy over fine.
stefanvdwalt
Workaround: copy all DLL files from \gimp\bin to the plugin folder.
James
Where did you get the BatchCropStraighten script? I can’t find it.
fmalan
I link to it in my post. Is the link broken from your side?
fmalan
Oh sorry – I thought you referred to GIMP. For Photoshop you need to have a recent version (CS5 or newer?)
Ian
I have Photoshop CS5.1 and CS6. The function for BatchCropStraighten is not an option. Do you know why this might be so? Did you have to create this script yourself or…?
bpjeee
Thank You.. Just tested it with GIMP 2 works like a breeze.. Really amazing as I have just moved to HP 8600 AIO from Canon and HP Software is useless….
Wilken
I really like your tool you’ve setup here, but any chance it can be worked to open and save tiff files as well?
fmalan
Should be easy – Gimp can do TIFF also. Just a question of filtering for .tif and/or .tiff file names and choosing the output format.
fmalan
Hi Wilken. I’ve updated the script, DivideScannedImages.scm, so that you can load and save tiff files as well (requires the extension to be .tif with one f). Download it from the link in the post above and overwrite the old one on your machine. I’ve tested it on mine machine and works a charm.
Wilken
Thank you so Much!, Now I can figure out where I was going wrong in the coding as well!
faadi
can you kindly help me out to have the same picture name after crop & straightening the picture?
In you tool, after cropping & straitening, it does change the picture name as IMAGE00001, but I want it to be stay the same as it was original.
Kindly advise on the solution.
Kaivalya
Thanks a lot for this post! The GIMP script works great… the perfect solution.
Sheryl Myers
Thanks!!!! It worked great after figuring out what settings worked best and where to put each photo on the scan so they are in order. I did have to install the 2.8.6 version of the main program to get it to work. For some reason the first download I did was 2.8.4.
DeJaVu
An excellent guide, but i need some book scans to be batch splited in the middle.
How could i do this using Gimp?
Thanks.
Sylvie
Hi I have a problem. When I save the picture, ilt,s in xcf files!!
SKF
It is a very good tutorial for installation, thanks a lot. However, I am unable to alter the file extension type when saving the splitted images. For example, it is png when I use extract or extract to, and gimp when I yse save or save as. Is it correct?
STL
You can also use ScanSpeeder to do this, it will also let you scan in multiple photos and automatically divide them. http://scanspeeder.com/
anonymous
ScanSpeeder works, but one by one :-(
Mike Ferrari (@itsmikeferrari)
Fantastic! Thanks!
S. NAGARAJ
I have a peculiar problem with my photos here. But these photos were individually accessible even a few days ago from my pen drive. But, for now, if a particular photo is clicked for viewing the whole batch appears on screen. The entire batch looks clamped to one another & seems inseparable. I can send you the sample.
fmalan
Hey S Nagaraj.
That sounds like an issue with the image viewer you’re using, and is outside the scope of this blog post. Have you tried viewing your images using another viewer (like Irfanview)?
Regards
Francois
S. NAGARAJ
HELP ME OUT PLEASE
urana84
Awesome! Did my 500+ scanned image collection to about 99% accuracy with only a few needing to be cropped manually! ;)
Nur
The Concordia Lutheran Church Men’s Club will once again be selling Christmas trees and whaters this year. The tree lot is located at the Church-School, 4245 Lake Avenue. Christmas tree sales will begin on Friday, November 23rd. The lot will be open 12:00 a.m. to 9:00 p.m. daily, except Saturday mornings, when it opens at 9:00 a.m. The proceeds from this fund raiser are used to support various projects and functions of the Concordia Church and school. A selection can be made from Scotch Pine, White Pine, Douglas Fir, Fraser Fir, and Blue Spruce. These trees were just cut a couple of weeks ago. Please come see how fresh they are. Decorated and undecorated whaters are also available. Your patronage would be greatly appreciated.
Matt Owen
Many thanks Francois for sharing this very handy solution. Like the poster above I’ve recently bought a HP 8600 only to find it will no longer separate photos scanned via the flatbed. Your post has saved me a lot of messing about, thank you!
Robert Wang
Thank you for the great work!!! But I followed the instruction on my WIn7 virtual machine, but after click OK it did nothing but close the Batch dialog. Even can’t see the progress bar moving. Is there a log view where I can see if the script ran to check if anything went wrong?
Albüm Taramak | Hazır aklımdayken...
[…] bu işe kalkışan ilk kişi siz olmadığınız ve hala dünyada iyi kalpli insanlar olduğu için şu sitede anlatıldığı üzere Photoshop ya da GIMP kullanarak bu zorlu işi otomatiğe bağlayıp […]
patricemny
Merci François! :)
Yoel
can this work on gimp mac?
fmalan
Hey Yoel
Haven’t tested it but it should work, yes!
Hamad
This is awesome! It neatly seperated 22 pictures in less than 30 seconds. thank you
duras
All seemed to work well, except that GIMP altered the DPI in all of my images.
All of the images were scanned in at 600DPI. When GIMP did the auto-cropping procedure, it automatically converted all my photos to 72DPI. Fail!
How can I retain the 600DPI?
Thanks!
fmalan
Hi Duras!
The dpi is just metadata, it doesn’t say anything about the digital resolution (number of pixels) of the image.You can always change the dpi (“pixels / inch”) without losing image information, by going to Image -> Print Size.
RD McKinney
Francois,
Thanks for your insights – much appreciated. I’m a casual user of Photoshop although there’s nothing casual about that product. I never tried batch scanning, and we need it to speed-up capturing old photos. I was looking at new printers/scanners with this capability, and didn’t realize that software existed to do batch scans. I will try your suggestions. Also, it may be prudent for me to look at GIMP in the event Photoshop starts to frustrate me.
RD
Ashlee
The illustration is for Oz Squad and Oz Squad wasn’t (isn’t) for kids. At least not the under ten set. Despite its reauoptitn (and unlike many of the newer Oz continuations) the Oz in Oz Squad is actually a pretty cheerful place. That you recognized all but 3 characters is pretty good. Jenny (standing behind Nick) and Milo (standing between Jenny and the Wizard) haven’t seen print yet. Ozzy (between Dorothy and Ozma) made his debut in .
Kelli
I have no experience with GiMP. I’ve tried downloading this plugin before, and have gotten no where. With your instructions, I was able to at least make it to step 4. However, i don’t see “Batch Scan” or “Divide Scanned Image” under the filter tab after restarting the program. I can see the unzipped file (DivideScannedImages) in the file folder. Any ideas?
Jalil
Como o pessoal veste a casmia do software que usa como se fosse uma nacionalidade . Foi sc3b3 uma brincadeira, mas sempre vem os caras com essas guerrinhas. Windows x Linux, Java /.Net e Delphi. Android x iOS.Cada um usa o que quer, o que achar melhor e fim. Uso Linux em casa, Windows no trabalho e iOS no celular. Desenvolvo em Delphi e C# na empresa, em casa fico brincando no Java e no Php, se aparecer um proposta melhor pra desenvolver em Ruby ee estudo a linguagem e aprendo. Quando vejo pessoal discutindo, sem ser em tom de brincadeira, por essas ferramentas me dc3a1 um grande desc3a2nimo. c389 como se um pedreiro discutisse com outro qual marca de cimento c3a9 melhor.
Syble
Seems to be a broken link to deskew. I opened GIMP as is and the scanning window opens as it did with my Epson printer, which is a nusiance, in that I have to reset it each time I scan.
When I recently purchased this Epson printer, it replace the window I normally had in Photoshop Elements and now that same scanning window continues with GIMP, Is this normal for GIMP?
Thanks so much for all your work.
FX
I installed all plug ins etc., no problem. Set input and output folders, .jpgs in the correct folder, hit “OK”, but nothing happens. Am I missing something?
Pat
I have not been able to download the deskew file. My virus checker states it is a threat and does not accept it. Any other sites to get it?
wandering
Francois – Many thanks for this. I’m using this now and converting the thousands of scan pictures I’ve always wanted to crop.
Kyle
Ohhhhhhhhh, my word. Thank you SO MUCH, my sis is getting married and I batch scanned eight hundred billion photos from our family albums for a slide show to run in the background and HPs newest drivers no longer allow for the separating of photos from scans done on their overpriced printers. THIS saved my life.
Povilas
I am building web-site, dedicated for the aircrafts my father built in ~24 years… Most of the pictures are “on paper”… I was planning to scan them for years….And this instruction…. Well – simply saved the day !
Gazillion thanks !
Anon
The script works but the batch script doesn’t. It just closes. I couldn’t find a solution.
Anon
I have solved the problem. The batch script doesn’t recognize ‘jpeg’ files. Adding ‘[e][E]’ in the script solved the problem.
faadi
The conversation by using this filter is working perfect but the filter is changing the name of the file after conversion. Is there any solution to keep the same name of the file after cropping it?
kindly advise!
Robert
I just found this script just did the work for me! It automatically crop & straighten the photo and save each result to directory you specified.
http://www.tranberry.com/photoshop/photoshop_scripting/PS4GeeksOrlando/IntroScripts/cropAndStraightenBatch.jsx
Save it to local then run it in the PS=>File=>Command=>Browse
Stephanie
I have a Mac. I got the batch separator to open up, set up my folders to draw from and divide into, but when I click OK, nothing happens. I go into that destination folder and it is empty. Have I missed a step? I experimented with using singular photographs and the function seemed to work in the sense that they were cropped and transferred into the destination folder, but the scans of multiple pictures are not being divided nor transferred. Any ideas?
Robert
@Stephanie I failed the first time. Then I just do it again, selecting the source folder and the destination folder, click ok then it should automatically open up each photo to do the crop and straighten and save.
faadi
The crop and straighten is really not good option in Photoshop, I used both options the code you mentioned in the link and the GIMP. I lost important area of the pictures after using the crop code in PS and when I used GIMP, it is working perfect without any loss of the images.
My issue is, I want to replace the same pictures which are using for the cropping with their original name. Currently gimp tool is generating its own serial number e.g IMAGE00001, but i want to save with original name.
Is there any way?
robert
The beauty of the script is that we don’t have to MANUALLY naming those cropped files, so it speed up the whole process. If you want to rename it to original file in the process it will slow down a lot.
Why don’t you find out those files you want to rename and do it manually after script is done if there aren’t lots of them?
faadi
Robert,
Thanks for the reply.
Yes, your idea is good to do it manually,
but I have a big batch of 40,000 pictures which cannot be done manually,
I need it to be done automatically as per the original name.
Kindly advise on any solution.
leeann
Thank you so much… you saved me so so much of my time and life!…i feel better …. Nicely written, made it seem do-able and it was! I highly recommend this!
derfliw
I am not alone with this problem.
You are a hero man!!
I got hundreds of photos to crop.
:)
Bruce Greene
Very difficult trying to integrate all these downloads.
Can’t find where they are. However, when trying to open deskew.exe., an error message surfaces stating libgimp-2.0-0.dll is missing.
I have searched and downloaded again the program and received the same message.
Appreciate the help.
Regards,
Bruce
fmalan
If you follow the instructions exactly like I listed them it should work. You shouldn’t “open” deskew.exe, just save it in the correct folder as indicated. The magic happens in Gimp.
GAGP
Do you do need a particular photo scanner WITH CROPPING FUNCTION and what you recommend, or is just a software function? thank for your answer.
fmalan
Hi! This is software, working on images that could have been acquired in any way (any scanner or digital camera)
Enjoy!
GAGP
Thank you so much!
I have another question: do you need a photo scanner, or you can just use a regular all-in-one inkjet? Thanks
harold
Thank you very much, I am very impressed with the wase and the results!
David S
Wow man!!! this is AWESOME!!! thank you soooo much!
chba
Just as a comment; I was looking for something to solve this problem. It turned out that the simplest way was using the Image Magick Package, with a script called multicrop:
http://www.fmwconcepts.com/imagemagick/multicrop/
That’s a way to do this on the command line, and it is quite easy to customize. For example, in my case the scanner imprinted a large shadow (30px wide) on one side of each scan. I changed multicrop to remove that border, and now it works like a charm.
Just fyi.
Mahdi
just wanted to let the fellows know that the canon’s CanoScan software has a mult-scan feature which separates the images automatically.
useful for business card scanning…
Ricardo
fmalan, thank you for this tutorial!!!
I was aware of the Photoshop feature for a long time, tried it several times and I gave up on using it cause it does not work properly. It is really a shame for Adobe, considering it is a part of Photoshop, which is a great software.
After reading your post I decided to give the GIMP plugin a try (I had never heard about this plugin before). I did a quick test with 50 scanned photos and it was able to crop and skew all of them with only minor flaws (really really minor flaws). These were the same photos I tried on Photoshop, which gave me ridiculous results.
I’m really impressed with the results. Considering it is 100% free solution, I’ll recommend this approach to everyone I know.
The only thing I wanna point out, is the problem saving the images on 72 DPI. I know you already answered this question, and I agree with you, there is no loss on picture quality, but we lose an important data, the real size of the image.
Is there any way to change the source code of the script to preserve the original DPI or at least create an Input variable allowing us to chose the desired DPI output?
I appreciate your help! Thanks again.
Ricardo
Just to let you guys know, I modified the DivideScannedImages.scm
Adding this line:
(gimp-image-set-resolution tempImage 600 600)
above this line:
(gimp-file-save RUN-NONINTERACTIVE tempImage tempLayer newFileName newFileName)
solved my problem, saving the images in 600 DPI instead of 72 DPI.
You can put any number you want (remember to change both of the 600), to match with the input file. (bare in mind this will not improve or reduce the quality of the original image, the total amount of pixels will remains the same).
If I have time I will create an input box to make things easier, instead of editing the source code.
Any help with this issue will be appreciate.
:)
fmalan
Hey Ricardo
Super, thanks for the compliment and the tip! It is a good suggestion; I’ll see whether I can add that sometime. If you do it before I do, feel free to let me know!
I don’t know how much of a programmer you are; I have put the script on github so you can do a “pull request” via that site if you’re faster than I am.
https://github.com/FrancoisMalan/DivideScannedImages
Otherwise I will update the script over there when I change it.
Warm regards
Francois
Tony
I’m trying the GIMP method. One thing I’m seeing is it doesn’t allow me to choose an individual file, only a folder from the “Load from” drop down.
So, if I’ve already processed some scanned files and don’t move them out of that folder it will process them all over again when I run the batch for more files.
Am I doing something wrong?
Helen C
Thank you! Worked perfectly the first time.
Great time saver.
Bill
I have an image of a bunch of postage stamps, each about an inch square, on a black background. There is plenty of contrast. No matter how I set the parameters, it just copies the entire image. Please suggest how to set the options. Thanks.
fmalan
Hey Bill – as a hack, can you try to take the negative of the image to make the background white, split it, and then convert it back to positive? (e.g. Irfanview does this easily and can also do it in batch mode).
Bill
I figured out how to make it work, by trial and error. Love it. Now I’d like to be able to change the color it uses to fill the edges when it straightens images – it uses white – can I change that to black? Also, is there a way to make it follow a prescribed sequence – I’d like it to go across then down. It seems arbitrary now. Many thanks, an excellent tool!
Jim
Hi Bill, would you mind sharing how you solved your problem with the stamp scanning as I would like to do the is well.
Jim
Week roundup 33 | .NET Development by Eric
[…] How to batch separate & crop multiple scanned photos. Just put multiple pictures on you scanner and this GIMP plugin will split them for you. […]
TOm
Hi, I’m having a little problem the script. After it is done, some pictures end up like this: http://imgur.com/bO3697Y
It looks like it isn’t properly cropped after the deskew. What can I do about this?
fmalan
Hi Tom
On the top you’ll see that there is a gray shadow / darker area that confuses the alignment and cropping. You can change the background threshold value?
Mary DeBlois
When I click on deskew.exe my PC says I cannot use that and to find something comparable.
Please advise. Thanks, Mary
fmalan
Hi Mary – that sounds like a strange thing… You’re not supposed to run deskew.exe manually yourself – this file is used by the Gimp script.
mpsanten
Looks very promissing, I see it select the image correctly, but then instead of turning it in the right direction it turns it the same degree in the opposite direction making the offset even worse. Maybe a version incompatibilty ?! I’m using gimp 2.8.10 on win8.1-64 bits
mpsanten
Never mind,, it’s apparantly something in the input file created by my scanner. If I first flip the images by 90 or 180 degrees, GIMP corrects it perfectly. So I’m guessing there’s a thin line, which I don’t see but GIMP does, that’s confusing the script. Thanks for the great tuturial.
Gabriel
Hi,
Thanks a lot for this!
How can I make this work without the deskew function? I have non-horizontal text and it is messing with the picture alignment.
Also keeping the original filename would be great if possible.
Thank you!
Kabby
Dear Francois
I followed your instructions to a “T” but I’m a dummy and couldn’t get this program to work, to split my photos :-(
Could you please perhaps post a list of instructions for “dummies” like me. I’ve got a heap of pages I have scanned with four photos on each, and would love to be able to separate them.
Your help will be greatly appreciated.
Kabby :-)
fmalan
Dear Kabby
Thanks for the comment. I would love to, but currently really don’t have the time. I tried to make it simple, but it does unfortunately still require you to copy some files by hand to certain folders.
For you the most time efficient solution would be to ask someone to help, in the mean time?
Regards
Francois
Обработка изображений с помощью…. LinqPad! | Немного о разработке
[…] этих целей уже готовые решения. Разрезать скан можно и фотошопом, и другими программами. Но мне было просто интересно […]
Whirley
Thank you very much for your clear advice and recommendations Francois. Its saved me from relying on my husband to sort everything out for me while also saving me a lifetime of scanning very old photographs separately to achieve the same result.
Janet Ward
This works like a charm thank you.
casey
Is there a way to automatically add a new border around the autodetected image?
So I scan many stamps against a black background, and would like to add a predetermined pixel count, or percentage of the original black background as captured to the autodetected rectangle for any given stamp/image so that i then end up with a 30 (50 / 75 whatever value) pixel black border around the autodetected image for example. Or if the resultant detected image is 900 x 600 pixels and I had a 10% factor for the adjacent black it would add 90 x 60 black pixels / 45 per side on X axis and 30 on the Y axis of the actual scanned background, not simply a black border superimposed…
Is this a possibility? I am running both PS and GIMP.
Thanks much, this would be hugely helpful to me! Casey
Kam
Hello
Your instructions were very clear and it worked a treat first time. I now hope to save a lot of time putting the rest of my family photos on my computer so that we can all share them.
Thank you for your support and please keep helping us.
Kam
Eric T.
I am going to bump up the request to add the ability to save the new filename based on the original filename.
For example:
john, smith.jpg
becomes
john, smith_IMAGE00001.jpg
john, smith_IMAGE00002.jpg
john, smith_IMAGE00003.jpg
For me, I am trying to process a few thousand jpgs that are of a small ID photo scanned on a whole sheet of paper.
fmalan
Hi Eric
Thanks for the suggestion. I would like to advertise that this plugin is available on Github, and I would welcome contributions!
https://github.com/FrancoisMalan/DivideScannedImages
Regards
Francois
Eric T.
Great, I put a request there.
Thibaud
Thanks a lot for that !
Photoshop didn’t do the trick for me, as it would open 1-3 new files for each file scanned, I didn’t manage to automate the saving of those (maybe I’m missing something)
Anyway, the gimp script is working like a charm, thank you !
As a note, if it can save time for anybody, I harshly modified the code in order to have the output folder to ALWAYS be the same as the input one (that’s what I wanted, for dozens of folders, so it was a waste of time to select the output each time). Just restart GIMP afterwards.
In the .scm file, I replaced “inDestDir” by “inSourceDir” when the file is being saved line 290
(script_fu_DivideScannedImages image drawable inThreshold inSize inLimit inCorner inX inY TRUE inDestDir inSaveType inFileName varCounter)
Replaced by
(script_fu_DivideScannedImages image drawable inThreshold inSize inLimit inCorner inX inY TRUE inSourceDir inSaveType inFileName varCounter)
Pat
I am having an issue with the dividescanned images. it only seems to detect the top image even tho there are distinct space beteen the photos.
Heath Boyer
Downloaded GIMP 3 times and deskew twice. when I try to open deskew it says can’t open because libgimp -2.0-0,dll missing.. Earlier attempts listed a slightly different dll I think. Is there a fix. Running w8 with classic Shell.
Poh Lin
I noted your comment on virus but Norton anti-virus is not allowing me to save deskew.exe directly also. It has threat name ‘WS.Reputation.1’
Could you please advise on this?
Appreciate it!
fmalan
Hi Poh Lin
This looks like a warning to me, not a virus (e.g. : Norton doesn’t trust my website). Try this link: https://www.dropbox.com/s/mkapwlhcunrk127/deskew.zip?dl=0 and then unzip it.
Regards
F
Bennie
Hi! The GIMP one worked for me but Ive been having problems.
1) When Its dividing the pictures it is only getting only one ouf of four of the pictures. I set the Selection Threshold to 25 like as you did. Is it because I put the pictures right in the four corners of the scanner? Should the pictures not touch the walls of the scanner for a better performance?
2) It seems to get some of the other pictures but it is only getting a specific part of the picture. For example a picture of a baby. Only the baby’s bib is showing.
Thanks a lot!
LARAINE
Hi really appreciate the notes on multiple scanning photos. I also have old postcards and would like to scan bothsides into one side by side. Is there an easy way to accomplish this
Thanks
Jim
Hi
I have spent 3-4 hours on this today and still cannot get this script to divide pictures from a scan. I scan white envelopes that have graphics on them and the background is black. I have played with all the settings (and it would be nice to find a description of each setting) and still the scan gets processed as one picture. The space between the 2 envelopes is usually 10-20cm. Any help with this or an alternative solution would be appreciated.
Rajinder Singh
Scanning many hundreds of family photos from 1909 to current … for my mom who is 89. This setup is a huge time saver, and no more tilted photos. Now she can see then on her large screen TV !!
Viva GNU, Viva Gimp, Viva Open Source, and VIVA Francois !!!
Merci , merci, merci
Johnny Sans Cash
Poof! You’re a Magician
Thank you from the bottom of my heart
TOTO
Is it better to use a digital camera (like EOS 600D for example) ?
ANd then to put them on GIMP for scropping ?
Thanks
Ed Chaney
Your instructions are clear and easy to follow. Even though my computer hiccoughed a few times, everything works as described. Truly amazing. Many, many, many thanks.
Ed
Asgher
guide on how to use these filters will help a lot
Riaan Van Der Merwe
Dankie, Francois, jy is ‘n ster!!
NathanS
I tried running it on a large folder of images. It made it’s way through the first few, and then just stopped. Great work on the ones it managed, but no idea why it won’t go any further. Tried repeating. No luck.
sb
I faced the same challenge when I was batch scanning photos of my parents. I tried to find a free tool that worked with all of my scanned photos, but no luck. So I ended up my own that solved my problem, hopefully this is something that is useful to others as well. (http://www.crop-photos.com/)
Ramesh
Awesome!!!
I appreciate your time and effort and very thankful to you for sharing with the community. Keep up the good work.
Thank you.
Scott
Is there any way to run this from a command line? I’ve spent some time trying to figure out script fu, and I just can’t figure it out.
RoyL
Did a great job on separating the images, but it also saved the complete, original image in the output folder. Is it supposed to do that?
Matt
hi, i just downloaded GIMP 2 for this windows 10 Laptop to help my dad with some images for his websites but need some help with the plugins.
first, i don’t have a scripts folder, so i just created one in the gimp/2.0/ folder, and pasted the second script.
How do I use deskew.exe? I copy and pasted it into the 2.0/plugins folder, try to run it, and it says some .dll files are missing. what to do?
thanks in advance)
Sandy
ScanSpeeder is a tool that will batch scan and automatically separate photos automatically. I used it to scan my entire family photo collection.
Bryan Vest
Just inherited a ton of pictures scanned 4 – 6 per plate from family members for a family tree project… Finding this blog was a life saver.
Thanks a ton
Guy Schrift
Hi ,
Worked wonderfully
Thanks a lot
Nawak
Thank you! But, seriously? Right-click disabled on your page?? Care to explain? It’s a hell of an annoyance!
fmalan
Hey
Thanks!
It’s the WordPress template I use. You can still save using “Printscreen”. Or just print the page, right?
Regards
Francois
Nawak
It’s not so much “saving” the page as selecting text and right-clicking “Search Google”… It’s a good thing to have when you are new to something…
Can you reenable it or do you feel it’s protecting from… something?
(Disabling right-click was all the rage a decade ago when people thought it would protect them from content theft, but it was quickly discovered it was just annoying users and not providing *any* security. For instance here we can still copy by selecting and CTRL-C / CTRL-V… but we are disallowed from making quick searches!)
Jennifer Goslee
I’m having a problem where it initially crops the image (usually aligned just fine) and then rotates it to add a quarter inch of white on one side.
Is there a way to just disable the rotation aspect of the script? I’m ok with having to manually rotate those that are off by 90 degrees, but this 5-10 degrees being randomly added to 20% of my pictures is rough.
fmalan
Hi
The easiest option for you would be to delete the “deskew.exe” file. This should make the script skip the deskewing step.
F
Jennifer Goslee
Thanks!
Sheila
Thanks so much. Like everyone, I have thousands of photos to scan. Still trying to fathom out why one batch of 3 was separated and the other batch of 3 remains the same, as 3 on a page. Any ideas please?
Sheila
Edit to above: I am running version 2.8.14 if that makes any difference
fmalan
Shouldn’t make any difference!
Dilip
For iOS (iPhone and iPad) users, Pic Scanner app is quite handy. It uses the device’s camera to scan up to four photos simultaneously, then crops and saves them as individual images. appstore.com/picscanner (Free download includes a 12-scan trial, and a $2.99 purchase unlocks unlimited scanning.)
Sheila Garcia
I’m not sure where my last post went! I think the info has been very helpful but wanted to know why, when I scanned 1 set of 3 photos it was separated correctly but another set of 3 kept them all in one file.
Could you explain why this might be?
Thank you
Sheila
I don’t know what happened to my last post! Anyway I though the information was very helpful but wanted to find out why, when I scanned a set of three photos they were separated correctly but when I scanned another three, it kept them all in one file.
Could you advise why this might be?
Thanks
fmalan
Hi
Probably the threshold value (or the background) was such that the algorithm couldn’t separate the images from the background properly.
Try adjusting the threshold value.
F
Sheila
Thank you
Raghu
I followed all the instructions above, but do not see the batch tools under the filters. Am i missing something?
Thanks
Sandy
Hi, I have tried adjusting the threshold values this way and that. There are 6 distinct images, all separated, on a white background. It’s still not separating them.
fmalan
Hi Sandy
Send me one of those to info@francoismalan.com and I’ll take a look what’s wrong
Francois
Volker
Great post! I would be glad to try that out – I installed everything as described, I see the script in GIMP – but it still does not do anything when I start it…
Did anyone have the same behaviour and found a solution? I am on Win10 with the newest Gimp Version…
Erik
Great post! I used Gimp nas as you said is a little bit tricky to set up the preferences in order to have a good result specially when the picture has hight definition and gets harder for the software to capture the background color. I used 400 for size threshold and worked well.
Again, great post, thank you so much for your help!
Minh
Hi there, I can’t seem to find that batchCropStraighten script in my menu? would you be able to send me a download link to it?
Love this post!
fmalan
Thanks! Is it only the “batch” version that doesn’t work? Can you send me a screenshot? You can email me at info at francoismalan.com
Dave B.
I’ve found a threshold setting of 15 works reasonably well. You need to pay attention to where the background colour will be sampled – the script allows you to specify a location relative to one of the four corners of the image, but only up to 100px on delta x or y. Having said that, it seems that the offsets need to be greater than 15 for it to work. I suspect the issue is due to the script adding a 15px boarder to the image and not taking this into account by adjusting the background colour sampling locations.
Now my issue: I have had trouble separating pictures with a pale, washed out, sky, which gets confused with the white background of the scanned image. I thought the answer to this would be to place a bold background coloured sheet on top of the photographs before scanning them. However, I found that this bold background colour (orange in my trial) made it hard for script to isolate each image and those that it did isolate had an orange boarder around them. The former problem seems to be due to the Xerox scanner adding a white 35px margin around the scanned image, which I can manually solve by changing the margin colour to match the background colour with “bucket fill” tool – but as I don’t know how to do it with a batch tool, this is a bit of pain. As for the margins around the extracted images, I have no idea why this is occurring, as the initial image selection frames look tight to each image when I watch the script running. (GIMP 2.18.14
Uncle B
I downloaded the latest ver of Gimp and installed it and the filter too. I get an error message when it gets to saving the first of 3 images I scanned together.( error while exicuting script_fudividescannerimages; error unknowm> ;17073748) arguement must be : pair. Whatever the heck that means! Could use a little help here. I am going to try to uninstall the latest version and install ver14 whilst I await a responce. Funny, most of the time people are asking me to help them with their computers, be it virus, malware, repairing system, or data recovery.
fmalan
Oh oh… This should obviously not happen. This looks like a programming error on my side, yet it works for me. Do you get this error with all images you’ve tried? Otherwise please email me the image at info at francoismalan.com
Jan
Hey, for a Linux version of deskew look here: http://galfar.vevb.net/wp/projects/deskew/ or here http://madebynathan.com/2010/05/13/scanning-lots-of-photos-at-once/ – i found some similar solutions for the multiple images prob but yours seems to be the best. Ill give it a try! ;)
Artur
Hi,
it’s possible to use deskew under Linux, it just need to be compiled and added to plug-ins directory, either local ~/.gimp-2.8/plug-ins/ or system wide /usr/lib64/gimp/2.0/plug-ins/
I’ve used sources from git repository:
https://github.com/prokoudine/gimp-deskew-plugin
Regards
Jr
Great info!
Worked like a charm!
John M
Seems to do a lot, get a “selection to path” progress bar that takes a second or two to complete, but also get an error “corrupt JPEG data: [108] extraneous bytes before marker 0xd9” and then nothing is actually created, not in the folder i told it to create nor anywhere else.
George
Love this. Saving me a lot of time and actually getting the job done.
Angel
Thank you so much, this gimp plugin is amazing!
Dealing with Old Photographs – Random Connections
[…] found a good script for GIMP that was supposed to be better than the Photoshop script. The article was written in 2013, and it […]
Bookmarks for October 3rd | Chris's Digital Detritus
[…] How to batch separate & crop multiple scanned photos @ francoisMalan – […]
Matic
Hi,
I’m looking for a simmilar script and found your site.. So I’ll ask you if you don’t mind..
I’m currently on a “portrait” type project where we’re shooting A TON of people on light gray background. We do a full figure shot, both sides, half figure, a couple of closeups, etc, about 10-15 images per person. We use white seamless, but don’t light is, so it’s light gray and light gradient of the bottom. The thing that’s cousing me a lot of work is cropping the images in post.
I usually end up with about 1000+ images that all need to be cropped, since I need a simmilar amount of negative space on all of them. So I was thinking, is there a way to automate this, some custom script for lightroom/photoshop? A script that would recognize the figure/content in the photo then ad x amount of margins (ie negative space), and auto crop the image, keeping the same 3:2 ratio.
Any idea how I could do that the fastest & easiest way?
Thanks a bunch,
Mat
andy
amazing…thx
Moritz
Awesome programm, dude! Many thanks!
Allan
Excellent tool – thank you. I wonder if you can help with some info. I’m trying to batch-convert hundreds of scanned square images that all have a black background I want removed. The defaults settings work well. But I’m still getting a very thin black line around each image. Some images are color, some are white. So the black line is noticeable when printing the converted images on while paper. I found increasing “Square border padding” increases the thickness of that black line. Therefore, being able to enter a negative number (-1, -2, etc.) would remove just a little more, thus removing the black line. Is there any possibility of you making that modification to the plugin?
fmalan
Hi Allan
Thanks for the suggestion! At this stage I don’t have time to work on this… The code is hosted on Github:
https://github.com/FrancoisMalan/DivideScannedImages
Here anyone is welcome to improve on it – you too! Want to try your hand at it?
Regards
Francois
Allan
Wish I could, but unless it’s written in complied in Super Basic, I would know where to begin. ;-)
Allan
I wish I could, but unless it’s written in “Super Basic”, I wouldn’t know where to begin. ;-)
Ville Tallgren
Huge thank you for setting up this tutorial. GIMP got the job done beautifully.
Daniel Fonseca
Great, wonderful job! Thanks!
Lee Siow
I get the following error:
Error while executing script_fu_DivideScannedImages:
Error: eval: unbound variable: gimp-image-select-color
Lee Siow
Got it to work after updating Gimp to the latest version
Thanks!
Andrii
Thanks so much! It did help me a lot!
Jacob Rijsdijk
I am looking for a Dutch tutorial to be able to batch devide scanned images
Vernon
Hi, I’ve downloaded your latest version (V2) but it doesn’t appear to save as .tif files, or am I doing something wrong?
leisa
Thank you so much! I got the splitter…but not the deskew
I could not run the Deskew exe, said something about a missing dll? I am on Windows 10 upgrade from 8.1….I understand a lot but not a wiz on the computer.
Any advice?
Herwig
The old version of the scipt works just fine, but the latest version of the script fails to load in GIMP 2.8.20.
B. Greene
I have win 10. Downloaded all the software noted above, had recommended photo separation. When entering the “OK” on Script FU, the operation goes thru a series. The results are “nothing”. There are no results.
Tried to find a file that contained the results. There is no photo breakdown as shown at the top of this page.
HELP!
Regards,
BTG
Dietmar
Great script, thank you for sharing!
It would be useful to be able to save the file with a variation of the original filename. Any pointers how the script could be modified?
Guillaume B.
Works perfectly! Thank you verry much! (Windows 7 – GIMP 2.8.22)
Weeble
Hi, same as “Vemon” in the thread I have downloaded version 2 from the blog post but only see options to save files as JPG and PNG, any suggestions?
fmalan
Hi Weeble. The script can import TIF, but only supports JPG and PNG as output formats. Why do you need TIF? You can always export to PNG and then batch convert to TIF.
Regards
F
Vernon
Hi, I would like to output to .tif files as I would like the output uncompressed (ie to maintain as much detail without any loss due to compression) for archiving purposes… please :-)
fmalan
PNG uses 8bpp *lossless* compression – i.e. no loss in quality.
Ajax
I just ran my first batch and it was GLORIOUS! Exactly what I needed. Then I ran my second batch. Accidentally left a woodsy scene in the corner, the script split it into over 200 different images and began saving them to individual files. Got 10 saved before I could cancel the script. So when it sometimes screws up, it screws up spectacularly!
Yes, I realize this was user error, not the script’s problem. I’m just enjoying having the time to be thankful on the internet because this has saved me SO MUCH TIME scanning family photos!
Dan Chowen
Between Photoshop CC 2015 and GIMP, I found Photoshop to be more reliable and user-friendly – but not cheap. I also tested 3 iOS apps. IMO the best value was one called Pic Scanner Gold (https://itunes.apple.com/app/id1124131441), based on image resolution, splitting precision and extra features. My only gripe was lack of EXIF editor, but you can use other free apps for it.
Andrew
Great stuff, I tried all the other ones, ie:- Autosplitter, Ransen scan,vuescan,photoshop,Scanspeeder. Gimp is great & its free. The best one out of the others was Autosplitter as it fixed the colours at the same time but I found it a bit slow scanning. I made a mistake with Gimp at first by scanning & then trying to crop the photos & it didnt work. I then found I had to save the scanned photos first & then it worked perfectly.
Thank you
Andy
Göran Karlsson
Seems this is working brilliantly for a lot of people. I wonder if anyone tried it with black and white (gray scale) photos?
I tried the script on my scanned pages from an old photo album with black and white pictures, and it was rubbish. It would get the odd picture right, but for the most part it quite random.
Papa_Paulo
Great thanks
Markt
Hi all,
Didn’t see any responses to it working on the new Windows 10 platform. I’m new so haven’t even tried downloading yet but have read all the posts. Is there now a win 10 version?
Helen M Bastian
Will Gimp work with Win 10?
Helen M Bastian
Will Gimp work with Win 10? Anything special I need to know?
Abbie S
WOW! This is great! Thanks so much for the very detailed directions including the specific path to the correct folder to put everything. I would have never known. Much, much appreciated!
Artie
This is awesome, what a live saver, works like a charm and is Free!!
TRAN Duy Nghia
Hi, I appreciate your tutorial. I have one question: I have to insert the images that I’ve separated into a pdf file where there are frames that I’ve pre-made. I want to put all those images in to the frames, which I want to set size so that I can print them out after and cut them into cards. Do you have any idea to automate this process? It takes me so long to drag each image in to the frame and resize it. Also the pdf format is so hard to manipulate but I don’t know which other software I can use to draw frames that I can define the size in centimeters.
Thank you in advance.
McPaulo
So much love for you guy ! So much time won. Thanks
Mack
Hi There,
Is there a way to save images from left to right instead of the default right to left?
I use it to crop scanned microfiches which have the orders from left to right.
fmalan
Hi Mack
Easiest would be to do a horizontal flip on your input images, and then horizontally flip them back after cropping. You can easily batch-process this using e.g. Irfanview.
Regards
F
DLJonsson
I had the same problem mentioned above ” arguement must be : pair.’
I reinstalled copying script to the the gimp plugins folder, and then moved the images off the network drive to my local home folder. Now it seems to work, still it would be interesting to know what field or variable it is having this pair problem, as have noted it on 2 different Ubuntu installs 16.04 and 18.04.
Otherwise it is a very fascinating piece of software that is even giving me good results with odd shaped objects.
Thanks for your work.
Christopher
Hi Francois,
I want to automate the overall jpg-image scanning process by calling your script via command line at the end of the scanning step.
Hours without result using the GIMP command line made me become desperate and now I just gave up.
For the beginning I tried using the default settings from the dialogue when being used in side the GIMP GUI. This is my (unsuccessful) approach:
set gimp=”c:\Program Files\GIMP 2\bin\gimp-2.8.exe”
%gimp% -i -b “(script_fu_BatchDivideScannedImages \”C:\\Users\\Me\\Desktop\\Test\” 0 FALSE 0 10 TRUE TRUE 25.0 100.0 FALSE 0 0 25.0 25.0 FALSE \”C:\\Users\\Me\\Desktop\\Results\” 0 0.8 \”Crop\” 1 )”
The outcome is:
batch command experienced an execution error:
Error: ( : 1) Procedure execution of gimp-display-new failed
The script works well when being used inside GIMP.
Do you have any idea or advise?
Thank you very much for your help in advance!
Cheers,
Christopher
shrikanth
Great info. It solved my problem. Worked in seconds. Thanks a lot for your information
Séparer automatiquement photos scannés ensembles – Il était une fois dans ma tête
[…] http://francoismalan.com/2013/01/how-to-batch-separate-crop-multiple-scanned-photos/ […]
mrdwab
The GIMP script is awesome.
I have a slightly different problem, though. On several of the pages, there are hand-written captions that I’d like captured. Since the captions are written directly on the page background, they get cropped out.
I’m exploring an ImageMagick script called “autotrim” right now (http://www.fmwconcepts.com/imagemagick/autotrim/index.php) but if you have any suggestions on what I should look at with this script as a workaround, that would be great. I’m guessing there’s something to be tried with selection and size thresholds, but I’m not really sure what those options do.
pr3sidentspence
This is going to save us so much work. Thank you!
I downloaded deskew.exe and put it in the C:\Program Files\GIMP 2\lib\gimp\2.0\plug-ins and I’ve checked Deskew in the options, but my images are not being rotated, just cropped.
Is there a way to confirm that it’s running deskew? Can I run deskew (from within Gimp) on its own, to make sure it’s working?
pr3sidentspence
I found the place to run deskew on its own (Layers->Transform) and it doesn’t seem to work for me. Bummer.
anonymous
I have scanned images with a single image (10×15 on a DIN-A4), but the script is committed to spliting the only image that appears. I just need the script to cut the only image that appears.
Is there any solution?
Matt
Batch Divide Scanned Images works with GIMP 2.8.14..
In the current version of GIMP (2.10), I could only get the script to work manually on individual scanned groups of photos. I could not get the batch script to work across multiple files.
If you’re having trouble getting the batch version to work, try the older version of GIMP linked above.
Good luck and thanks for the script!
Martin
Thank you very much. For those on a Mac: GIMP works with Wine.
Martin Schoenmakers
I needed this today, installed GIMP 2.10.12 and it works like a charm, right away.
THANK YOU !!!
Only one question: I get quite wide borders around the pictures. Is it possible to have them without borders?
Heinz
There are bugs if the border of the photos is on the border of the scan.
yo
It worked! thank you very much
DLJonsson
Divide Scanned Images a wonderful application but hard to mod for those of us that are unfamiliar with the scripting language is coded in. Sometimes I wonder how the program would evolve if ported to Python and/or if that is even possible?
MIB
I tried DivideScannedImages.scm on both GIMP 2.10.12 and 2.8.14, they all noticed me
“Error while loading D:\Program Files\GIMP 2\share\gimp\2.0\scripts\DivideScannedImages.scm:
Error: (D:\Program Files\GIMP 2\share\gimp\2.0\scripts\DivideScannedImages.scm : 7) eval: unbound variable: <!DOCTYPE "
any help?
Joseph S Delrie
I can not get this to work in Win10 build 1903, Gimp 2.10.12. The error message I get is ” not enough arguments”. Please help me with this. I really need to get this to work.
Joseph S Delrie
I am getting error message ” not enough arguments” . After running this script several times, it just doesn’t seem to work regardless of what I do. Win10 1903, Gimp 2.10.12.
Phyllis
Now there are also a few other programs that do this, some free and other not (price range $30-60). Here’s one such app’s demo (for Mac only): http://www.youtube.com/watch?v=3419FAL2atM
Jussi
I’ve used earlier the older version and was very happy. Tried to installe the improved version now, but the DivideScannedImages_improved_v2.zip (click here) doesn’t seem to contain anything. It is an empty zip. Any reason for that?